System Check, Preparation & First use
The following procedure requires approximately 20 minutes to complete. During this time please read the entire manual to better understand the Behmor Roaster functions, our user tips and key maintenance procedures. By taking the time to thoroughly read and follow the advice in the guide and manual, you will experience fewer troubles and more enjoyment from your coffee roasting.
System Check: To insure all functions are working properly, press each button within each group in the following order:
- Press all “Weight” buttons starting with ¼, ½, to 1, noting time in the display changes.
- Press the “Profiles” buttons starting with P1 through P5, noting changes on the display.
- Press Programs A through D, again noting display changes.
- Press each time increment (+ then -), Light, Cool, then OFF.
Start will be tested in the next step.
Failure to perform this test in the proper sequence, as noted above, could give the false impression the C and D buttons are not functioning.
Preparing the Behmor Roaster for Use:
Before first use, remove the cleaning brush from the roasting drum, remove stray pieces of packing materiel from the roasting chamber, and clean the interior with a moist cloth.
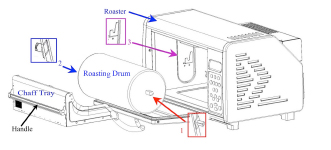
Next, carefully place the roasting drum into the roasting chamber as shown above, inserting the right end (square peg – red arrow in diagram) into the motor drive while laying the left end (round peg with groove – blue arrow in diagram) onto the holder. You may find the square peg requires slight rotation of the roasting drum for it to slide fully into place. You will know it is place when the left (round) side’s groove drops into the holder’s cut away. Always double-check to insure the roasting drum is properly in place.
Install the chaff tray by gently depressing the spring loaded handle downward, slide it into the roasting chamber until it goes no further, and release the handle. Improper placement can prevent the roasting drum from rotating properly, causing a jam. (See Chaff Tray Instructions for further details)
Close the roaster door ensuring it is shut tightly.
Press ![]()
This procedure, also referred to as a dry burn, is necessary to help eliminate any residue left in the roaster during the manufacturing process while also serving to “season” the roaster and door gasket. During the first few roasts you may see some very faint smoke from the exhaust or gasket area but this should cease as the system self-cleans, seasons and fine-tunes itself. This same procedure is used for periodic system self-cleaning coupled with Simple Green or other non-caustic, non-abrasive cleaner, as described later in “Part 6: Maintenance.” While the system is performing the dry burn please read the manual, paying close attention to “Part 5: Tips.”
Low Profile Chaff Tray (Behmor Inc. BT1000NV)
Installation and Proper Placement Instruction Guide
Before inserting chaff tray, ensure the flap (shown below left- 4a) is in a “roast” position. It should be slightly downward so as the roasting drum rotates, it pushes the flap into a non-intrusive position, yet still captures floating chaff. Next depress the spring-loaded handle downward (see below). This allows the vanes to drop flat for roasting drum clearance. Slide the chaff tray under the roasting drum, releasing the handle after the tray is in place.
Proper Chaff Tray Placement:
Ensure the chaff tray does not impede the rotation of the roasting drum. Proper placement is imperative. Please take a moment to do the following:
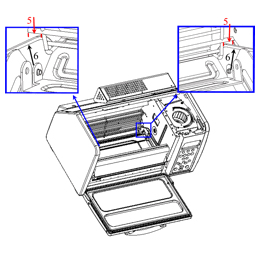
- Open the roaster door. Note the grill that protects the quartz heating elements extends across the back except for small gaps ( arrows #5 below) on the left and right sides.
- Take the chaff tray and slide it in.
- Be sure the front of the chaff tray’s sidewalls ( #6 arrows below) slide all the way into the gaps(#5 arrows).
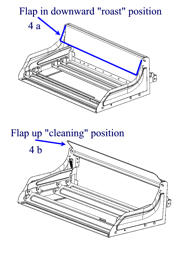
To Clean: To remove the chaff tray, depress the handle to flatten the vanes, and slide the tray out of the chamber. Swing the flap up (shown above in 4 b) from its “roast” position (4a) to allow the tray contents to be dumped. Remember to move the flap back into a downward “roast” position (4a) in preparation for your next roast.
First Use Guide
Learn the Behmor Roaster:
Whether new to, or experienced with roasting coffee, ALWAYS start off by roasting at least four (4) ¼ pound batches on P1 to begin developing an understanding of the subtle nuances of roasting coffee with the Behmor.
Once comfortable migrate to ½ pound roasts and later to 1 pound roasts. Always forward think your roast by 15 seconds as well use our Rosetta Stone tip (shown below) and also found with other valuable tips in Part 5 of the manual.
NEVER START with quantities above ¼ when first learning the roaster !!!
Preheat:
We’ve found through testing, a more robust roast can be achieved by doing a 1:30 minute preheat* of the system.
Always Preheat chamber w/ tray in: Press _____ then_____
When timer reads 7:00 Press _____
Slide tray out, insert roasting cylinder w/ beans and start your roast. Remember use caution while working around hot surfaces.
*Preheat for a maximum 1:30 minutes, longer could activate a safety feature, which prevents a restart
Trial/ Practice Roast:
- Place ¼ pound of green coffee in the roasting drum
- Preheat the chamber as described previously
- Insert tray and roasting drum (with beans) in the roaster
- Press then use Rosetta Tip as shown/ explained below
Important Safety Reminder:
The Behmor Roaster is not a set and walk away device, always stay by the roaster when it is in use!
Never leave the roaster unattended when it is in use. User supervision is required to control the roast. Preset times/ programs are merely estimates and manual cool buttons are provided so the user can cease the roast at any time. It is your responsibility to act and use the Behmor Roaster in a safe manner as described in all sections of the manual including Safeguards and Warranty. Like all foods placed close to high heat, coffee beans can ignite
**New Safety Feature: Unattended Auto Safety Shutoff (Err7) – See Page 9 in the Manual for details
Roasting Tips:
- Key Tip – “Rosetta Stone” C button Quick Reset Feature: see Page 9To better anticipate a roast hitting 2nd crack (2C) and for superior roast control ALWAYS use the following time guides and tip.
Once you hear the “first” cracking sound of 1C adjust times as close to the following using the + or – buttons This allows you to more accurately control and understand where you are in a roast, especially in cases where you have a bean type that migrates from 1C to 2C seamlessly. This also helps to prevent you from over-roasting your beans.- ¼ lb – 1:30 minutes
- ½ lb – 2:10 minutes
- 1 lb – 3:10 minutes
The times shown are approximately the time it takes from start of the very first snap of 1st crack (1C) to the start of 2nd crack (2C) for regular coffee. Once you hear the start of 2C press cool. Decaf and aged or monsooned coffees, such as Malabar, roast faster and get darker more quickly.
- Always forward think your roast by 15 seconds. This is the amount of time that is required to start reversing the trend from roasting to cooling. Whether new to, or experienced with roasting coffee, start off by roasting several ¼ pound (P1 profile) batches to begin developing an understanding of the subtle nuances of roasting coffee with the Behmor Roaster.
- Never gauge your degree of roast by the appearance or non-appearance of ‘oils’. The Behmor, being a drum roaster (much like professional coffee roasting equipment) does not tend to form visible “oil” during the roast but rather oil droplets will start to appear in about 24 hours, building up further after several days of rest. If you see heavy smoke, bluish smoke or are in a heavy rolling 2nd crack your beans are “dark” and in imminent danger off igniting. Press COOL.
More tips appear in the manual so please read thoroughly and remember to visit our website for updates.
Key Maintenance:
-
- After every five (5) roasts* we recommend you do a system dry burn in combination with cleaning the interior with Simple Green or other non-caustic, non-abrasive cleaners (Never use- Easy Off, Bon Ami. Ajax, Comet etc). This is done to insure there is no sediment build-up blocking a key sensor. A key area to keep clean of oils/ sediment is shown below in the box. Make sure the roaster is unplugged! Then lightly spray the metal sides only (always avoid spraying the roasting elements whether hot or cold), allow to sit a minute, then wipe all moistened areas thoroughly clean. Now place the roasting drum (empty) and chaff tray in the oven chamber as if doing a roast, close the door, press 1/4 then Start. Complete a full roast and cool cycle. *Darker roasts require more frequent cleanings/ dry burns.
- We also recommend that you clean your DC fan’s impellors/ electronics chamber every four months or sooner. In some locations, such as areas of high dust, or other airborne particulates, the impellor blades of the fan/ PCBs will get coated with buildup. This can cause the system’s roast times to become extended as adequate and proper air circulation is restricted or cause component failures.
Failure to regularly perform ALL maintenance procedures will lead to longer roasting time