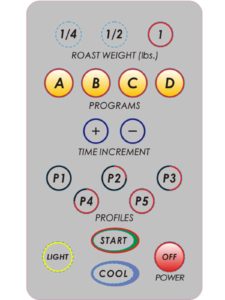
The new program, once a roast cycle is begun, gives you the ability to:

- Read thermistors by pressing A (exhaust channel temp once exhaust fan is active mid-roast) or B (chamber wall temp) *Temps shown are for information ONLY & Not internal chamber/ bean temps
- Reset time to Rosetta Stone times (Part V Paragraph 3 manual) – C button
- Change motor speed (D button) *must be in Manual mode
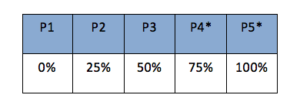
- Change power to the elements in increments:

Auto Safety/Unattended Shutoff Feature (Err 7)
At 75% into a roast, based on standard system default times* the timer will start blinking un:30..29, 28 etc.. The user has 30 seconds to press START otherwise it will automatically go into cool flashing err7. This is a required safety feature in both Automatic and/or Manual Modes
Rosetta Stone “C” Button Feature
Press C (for crack as in first) and it will reset the timer according to weight as per our “Rosetta Stone” times which are associated with approximate time it takes to go from the first crack of 1C to start of 2C. It is merely an approximation but provides users better understanding of where they are in the final stages of a roast cycle.
Manual Mode
Begin a roast (Weight – desired, then Press Start), once a roast has begun at any point press either P1 – P5 to go into Manual mode
- Press P1 – P5 to change power- whatever is pressed “blinks” to denote which setting
- P1 – P3 recommended settings for finishing a roast
- P4 – P5 recommended for use ONLY in beginning phases of a roast, using P4 – P5 into 1C (first crack) when combined with bean mass heat will likely lead to bean scorching as well to overheating of sensors and err2 message. (see page 2 for professional suggestions)
- Change Motor speed – press D (drum)
- Reset time to weight (Rosetta Stone) – press C
- Press 1 at any time to return to Auto Mode (Auto mode runs simultaneously with Manual Mode- should you toggle back to Auto the time left/ roast cycle will be the same as when you left Manual mode)
**Professional Roasting Tip** Roast with Manual Mode to finish:
Close door, press desired weight: Example 1/2 then START (default Auto P1)
Once user hears First Cracming sound wait appx: 10-15 Seconds
Press P3, C, then D
** For FC you will need to add time using + or C.
Press COOL as needed
** Reason you are adding time is you are cutting power P3 to 50% which sustains heat but gently, allowing beans exothermic momentum to work and prevent sorching beans.
Recap- NEW features activate ONLY once a roast cycle has begun
In Auto (default) all buttons act the same as in current system except ABC, for temp readings and time reset.
In Manual (only functional after starting a roast).
Button 1: Returns system from Manual mode to Auto (defaults).
Buttons A-C same as in Auto.
Button D drum / cylinder motor speed toggle from standard ( 8 rpm) to hight ( 16 rpm).
Buttons P1-P5 power to elements: P1-0, P2-25%, P3-50%, P4*-75%, P5*-100%.
*P4 and P5 (Manual Mode Only) are not recommended after 1C (first crack) has begun.
All other buttons 1/4,1/2,+, Cooling, Light, Off remain the same in either program.
A system Self-test can be performed by unplugging the roaster, press and hold START, plug in and release START. The Self-test will display Program version, check all functions to include display. It will run a full check TWICE. Standard Default times are 18:00 for 1LB, 12:00 for 1/2LB, and 8:30 for 1/4LB.
“C” Are you using it to its fullest potential, if at all?
Do you have the Behmor 1600 Plus or have you upgraded with the Plus panel? Do you know about the “C” Button?
The “C” Button function was originally intended to instantly reset the timer to the approximate time it takes to go from 1C to 2C using P1 in the P1 Auto mode, but it also does so much more!
Did you know that if you Press “C” when you are even close to the time window of the unattended safety feature, it by-passes it?
I prefer to roast 12 ounces as the ideal batch size for 4 days worth of coffee. In those cases, I hit “C” with about 4:45-5:30 left on the timer and it jumps to 3:10, thus bypasses the unattended safety feature because this tells us you are there and you are actively interfacing with your roaster- which is our goal!
Another handy use of the “C” Button, is in low voltage situations, you can press it numerous times towards the end of the roast, extending available roast times.
Obviously, in both cases, the user is still in charge of the roast and prudence is advised.
Although this extremely useful “Rosetta Stone” tip is available in the manual and posted on forums, many home roasters are still not taking advantage of it, so we hope that you will.
Hope this helps add to your roasting experience.